
The Ultimate Halloween Treat: Birthday Cake Macarons Transformed into Mummies
Looking to scare up some Halloween fun with a spooktacular treat? These Mummy Birthday Cake Macarons are the perfect Halloween dessert!
Table of Contents
This article is about to unveil the perfect concoction that combines the sweetness of birthday cake with the spine-chilling charm of mummies. Get ready to sink your teeth into the ultimate Halloween delight: Mummy Birthday Cake Macarons!
Can you tell I’m all about the Mummy theme this Halloween? Make sure you check out Spooky Mummy Meatloaf Balls Recipe and Spooky Mummy Pepperoni Stuffed Banana Peppers.
If you’re tired of the same old Halloween treats, this step-by-step guide will show you how to create delectable birthday cake macarons that will not only satisfy your taste buds but also wow your guests with their hauntingly adorable appearance.
From the ingredients and equipment you’ll need to the intricate process of assembling the mummy macarons and adding the finishing touches, we’ve got you covered.
But that’s not all—we’ll dive into the world of macaron coloring and answer the burning question: Can you freeze macarons?
Plus, we’ll share some invaluable tips and tricks for success that will have you creating bakery-worthy macarons in no time.


Mummy Birthday Cake Macarons Ingredients
To create these frightfully delicious Mummy Birthday Cake Macarons you’ll need a handful of key ingredients. Here’s everything you need to gather before diving into the macaron-making process.
For the macaron shells, gather almond flour, powdered sugar, granulated sugar, cream of tartar, vanilla extract, and aged egg whites.
Almond flour provides the nutty base while the powdered sugar and vanilla adds sweetness and a smooth texture.
The granulated sugar and egg whites will be used to create a meringue, which gives the macarons their signature lightness. The cream of tartar is added to the meringue and gives the macarons their unique chewiness,
Aged egg whites are crucial for achieving the perfect consistency, so be sure to separate the eggs and let the whites sit in the refrigerator for at least 24 hours before using them.
For the macaron filling, you’ll make a homemade buttercream icing…that’s incredible! You’ll need butter, powdered sugar, vanilla extract, cream, and sprinkles!
Finally, when it’s time to assemble and create the mummy design, you’ll need white chocolate candy melts and candy eyes.
Equipment Needed for these Halloween Macaron Cookies
A food processor or blender will come in handy for grinding the almond flour and powdered sugar into a fine consistency.
A stand mixer or handheld electric mixer is essential for whisking the meringue, while a piping bag fitted with a round tip will be used to pipe the macaron batter into perfectly sized shells.
Finally, a baking sheet lined with a silicone baking mat will ensure even baking and easy removal.


Creating the Birthday Cake Flavor Macarons
With the necessary tools at your disposal, it’s time to dive into making the mummy birthday cake macarons.
Begin by preheating your oven to 300°F (150°C). This will ensure that your macarons bake evenly and develop that coveted crunchy exterior while maintaining a soft and chewy center.
While the oven preheats, it’s time to prepare the macaron batter.
Start by combining the almond flour and powdered sugar in a food processor or blender, pulsing them together until they are finely ground and well mixed. This step is crucial in achieving a smooth and consistent texture in your macarons.
Next, using a stand mixer (this is my favorite stand mixer) whisk the egg whites on medium speed until they form soft peaks.
Gradually add in the cream of tartar, vanilla, and granulated sugar, continuing to mix until the meringue reaches stiff peaks. This will provide the necessary structure for your macarons.
Now, gently fold the almond flour and powdered sugar mixture into the meringue using a rubber spatula.
This process, known as macaronage, requires a delicate touch to ensure that the batter is well combined without overmixing. The end result should be a thick, smooth batter that flows off the spatula in a ribbon-like consistency.
Once your batter is ready, transfer it to a piping bag fitted with a round tip.
Holding the bag perpendicular to the silicone-lined baking sheet, pipe small circles of batter, about 1 inch in diameter, onto the sheet. Space them evenly, allowing room for the macarons to spread during baking.
I prefer this macaron baking set because it shows me EXACTLY where to pipe my Mummy Birthday Cake Macarons so they’re perfectly consistent every time!
Now that your batter is piped onto the baking sheet, gently tap the sheet on the counter a few times to release any air bubbles trapped in the batter. This step will help prevent your macarons from developing hollow shells.
With the batter prepared and the macarons evenly spaced on the baking sheet, it’s time to place them in the preheated oven.
Bake for approximately 14-16 minutes or until the macarons have developed a lightly golden edge and have formed their signature “feet” on the bottom. Remember, oven temperatures may vary, so keep a close eye on your macarons to avoid over- or under-baking.
Once the macarons are baked to perfection, remove them from the oven and allow them to cool completely on the baking sheet. This will ensure that they are firm enough to handle without losing their shape.


Making the Buttercream Macaron Filling
Cream the butter until soft and fluffy in a mixing bowl. Gradually add the powdered sugar, vanilla extract, and 1 tbsp of heavy cream or milk.
Mix until smooth. If needed, add another tbsp of heavy cream or milk for desired consistency. Gently fold in the Halloween sprinkles.
You’ll want to make the buttercream filling AFTER your birthday cake macaron shells have cooled. The buttercream will harden so you’ll want to use it quickly.
Assembling the Mummy Macarons
Now that you’ve mastered the art of making the birthday cake macarons, it’s time to move on to the fun part: assembling these adorable mummy cookies.
Assembling the mummy macarons is a straightforward process that will bring these spooky treats to life.
First, gather all of your cooled macaron shells in pairs, making sure they are matched up in size and shape. Next, fill a piping bag with a generous amount of the buttercream macaron filling.
This creamy filling will act as the adhesive to hold the macaron shells together.
Starting with one pair of macaron shells, gently squeeze a small dollop of vanilla buttercream onto the bottom side of one shell. Then, press another shell on top, sandwiching the filling between them.
Repeat this process until all of the macaron shells are filled and assembled.
Now comes the fun part – creating the mummy look!
Take a small offset spatula or a butter knife and apply a thin layer of vanilla buttercream on the sides of the macaron sandwich, leaving the top surface bare. This will create a solid looking cookie.
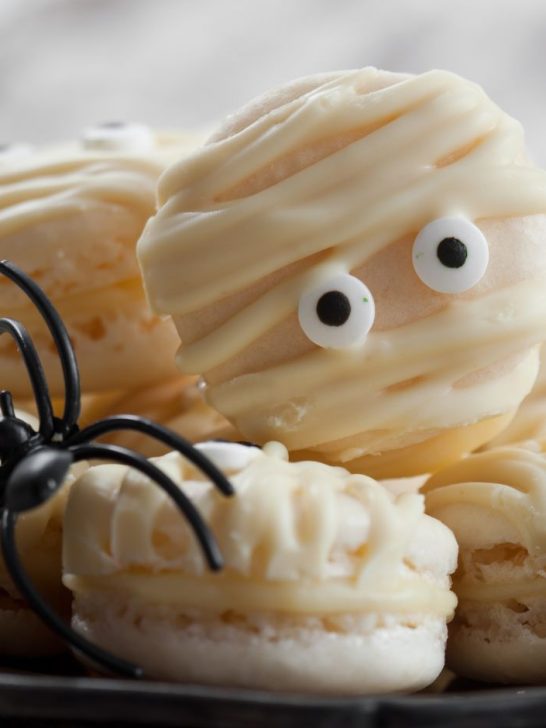
Melt the white chocolate candy melts and transfer to a piping bag with a thin flat tip. Pipe horizontal lines across the macarons, leaving a little space in the center for the eyes.
These lines should overlap each other in a haphazard manner, resembling the random wrapping of mummy bandages. Don’t worry about perfection here – the messier the better! This will resemble the mummy’s bandages.
Place two candy eyes in the open space on front of the macarons. These eyes will give your mummy macarons their characteristic, spooky expression.
To add a final touch of authenticity, take a toothpick or a small knife and gently scrape away some of the white icing in certain areas. This will create the illusion of worn and tattered bandages, adding depth and texture to your mummies.
With the finishing touches complete, your mummy macarons are now ready to make a spook-tacular statement at your Halloween celebration. But before you unveil them, let’s learn how to bring some color to these eerie treats.,
Coloring Macarons
To continue the macaron magic, let’s explore how to infuse these ghostly treats with a bit of color.
While the classic mummy macaron is typically dressed in shades of white and gray, adding a pop of color can transform your macarons into a vibrant Halloween delight. Whether you’re looking to create a vibrant mummy army or give each macaron its own unique personality, coloring macarons opens up a world of creative possibilities.
When it comes to coloring macarons, it’s important to choose gel or powdered food coloring over liquid alternatives.
The liquid can throw off the delicate balance of the macaron batter, resulting in flat and deflated shells. Gel and powdered colors, on the other hand, provide a concentrated pigment without altering the texture of the macarons.
To incorporate color into your macaron batter, you can simply add a small amount of gel or powdered coloring to the meringue before folding in the dry ingredients.
Start with a small amount and gradually increase until you achieve your desired hue. Remember, a little goes a long way, so be cautious not to add too much coloring as it can affect the overall consistency of the batter.
If you want to create a marbled effect or have a more intricate design, you can divide the batter into multiple bowls and color each portion separately. Use a toothpick or a small spatula to gently swirl the colors together, creating a mesmerizing pattern.
Just be careful not to over mix, as it can cause the macarons to lose their signature smoothness and develop cracks.
Once you’ve mastered the art of coloring the macaron batter, it’s time to move on to the filling. Whether you stick with a classic buttercream or venture into uncharted flavors, adding a touch of coloring to the filling can enhance the visual appeal of your mummy macarons.
For a cohesive look, you can match the filling color to the shell or create a contrasting effect by opting for a complementary shade.
With your colored macarons complete, their chilling transformation will bewitch all who lay their eyes upon them.
Can You Freeze Macarons?
Freezing macarons can be a valuable strategy when it comes to party planning and time management. Whether you have a busy schedule or simply want to get a head start on your Halloween treats, freezing macarons allows you to make them in advance without compromising their taste or texture.
When properly frozen, macarons can be stored for several weeks, granting you the flexibility to bake them ahead of time and focus on other party preparations. This means you can have a stash of delicious birthday cake macarons ready to go whenever you need them, without the stress of last-minute baking.
To freeze macarons, simply place them in an airtight container or freezer bag. It’s important to ensure they are well protected to prevent any air exposure, which could lead to freezer burn and affect the quality of the macarons.
You can separate the layers of macarons with parchment paper or wax paper to further safeguard their delicate nature.
When it’s time to serve your frozen mummy birthday cake macarons, the key is to let them thaw gradually in the refrigerator. This slow defrosting process helps maintain their original texture and prevent any unwanted moisture buildup.
It’s recommended to remove the macarons from the refrigerator about 30 minutes before serving, allowing them to reach room temperature and fully showcase their flavors.
By freezing macarons, you not only save time but also ensure a consistent taste experience for your guests. Plus, you can impress them with your organizational skills and attention to detail as you effortlessly bring out a tray of perfectly preserved mummy macarons.
Tips and Tricks for Successful Birthday Cake Mummy Macarons
Firstly, it’s important to remember that precision is key when measuring out your ingredients.
Macarons are notoriously finicky, so using a kitchen scale to measure your almond flour, powdered sugar, and egg whites will help you achieve the perfect consistency. Even small variations in ingredient amounts can affect the texture and structure of your macarons, so be meticulous in your measurements.
Another tip for success is to be patient with the macaronage process.
Macaronage is the step where you carefully fold the dry ingredients into the meringue. It may take a few tries to get the right consistency – a smooth and glossy batter that flows off your spatula in a thick ribbon.
Don’t rush this step, as over-mixing can lead to flat macarons with no feet, while under-mixing can result in cracked shells.
Additionally, investing in a good quality silicone macaron mat or parchment paper with printed macaron templates can make a world of difference.
These tools provide a guide for piping consistent-sized macarons, ensuring they all bake evenly. They also help prevent spreading during baking, which can result in misshapen macarons.
Lastly, don’t be afraid to experiment with flavors and fillings.
While the mummy macarons in this recipe use a classic birthday cake macaron flavor, you can get creative and try different combinations.
From fruity fillings to decadent chocolate ganache, the possibilities are endless. Just remember to let your macarons mature in the refrigerator for at least 24 hours before serving to allow the flavors to meld together.
Now that you’re armed with these tips and tricks, you’re ready to take your macaron-making skills to the next level.
Are Macarons Vegan?
When it comes to catering to different dietary needs, it’s always important to consider options for vegans.
So, are macarons vegan?
The short answer is: it depends.
Traditional macarons are made with egg whites, which may not align with a vegan lifestyle. However, fear not! There are alternative recipes and methods that allow for delicious vegan macarons.
To make vegan macarons, egg whites are typically substituted with ingredients such as aquafaba, which is the liquid left over from cooking chickpeas, or flaxseed meal mixed with water.
These substitutes can produce a similar texture to traditional macarons, resulting in a delicate and chewy shell.
In addition to finding the right egg white substitute, it’s important to ensure that all other ingredients used in the macaron shells and fillings are also vegan-friendly.
This means using plant-based alternatives for butter, milk, and any other animal-derived products that may be included in flavorings or coloring agents.
As with any baking endeavor, it’s essential to carefully read ingredient labels and verify the vegan status of all components. Finding vegan-friendly versions of certain ingredients may require a bit of extra effort, but the result is well worth it when you can share these delightful treats with everyone, regardless of their dietary preferences.
So, if you’re looking to create macarons that are suitable for vegans, it’s definitely possible with a little creativity and some ingredient substitutions.
Whether you’re hosting a Halloween party or simply want to broaden your macaron repertoire, having vegan options available will ensure that everyone can enjoy these delectable morsels.
As you embark on this baking adventure, remember the words of Julia Child, who once said, “A party without cake is just a meeting.” So, don’t miss the opportunity to bring joy to your guests and yourself with these spooky mummy birthday cake macarons that are truly the life of the Halloween party.
Printable Recipe for Halloween Mummy Birthday Cake Macarons


Mummy Birthday Cake Macarons
✨ Mummy Birthday Cake Macarons! ✨ Dive into the world of spooky-sweet treats with these delightful mummy-decorated birthday cake macarons.
Light, airy almond shells paired with a sprinkle-infused birthday cake filling – all dressed up as adorable little mummies.
Perfect for birthday parties, Halloween celebrations, or just a fun baking weekend. Save this pin for a recipe that's sure to impress and delight!
Ingredients
- For the Birthday Cake Macaron Shells:
- 1 cup almond flour (fine)
- 1 1/4 cup powdered sugar
- 3.5 egg whites, room temperature
- 1/4 cup granulated sugar
- 1/2 tsp cream of tartar (optional, for stability)
- A few drops of vanilla extract or seeds of one vanilla bean
- Gel food coloring (optional, for desired color)
- For the Birthday Cake Macaron Filling:
- 1/2 cup unsalted butter, room temperature
- 1 3/4 cup powdered sugar
- 1 tsp vanilla extract
- 1-2 tbsp heavy cream or milk
- For Mummy Decoration:
- White candy melts or white chocolate, melted
- Edible candy eyes
Instructions
- Preparing the Macaron Shells:
- Sift together almond flour and powdered sugar in a large bowl. Set aside.
- In a clean, grease-free bowl, whip the egg whites on medium speed until foamy.
- Add the cream of tartar and continue to whip while gradually adding granulated sugar. Increase the speed to high and whip until stiff peaks form.
- Add the vanilla extract and gel food coloring if using. Whip just until combined.
- Gently fold in the almond flour mixture, making sure not to overmix. The batter should flow like magma.
- Transfer the batter to a piping bag fitted with a round nozzle.
- Pipe small rounds onto a baking sheet lined with parchment paper.
- Tap the baking sheet on the counter a few times to release any air bubbles.
- Allow the piped macarons to rest at room temperature for 30 minutes to an hour or until they have formed a skin.
- Preheat oven to 300°F (150°C).
- Bake the macarons for about 12-15 minutes. They should be firm to touch but not browned.
- Let them cool completely on the baking sheet.
- Making the Birthday Cake Filling:
- Cream the butter until soft and fluffy in a mixing bowl.
- Gradually add the powdered sugar, vanilla extract, and 1 tbsp of heavy cream or milk. Mix until smooth. If needed, add another tbsp of heavy cream or milk for desired consistency.
- Transfer the filling to a piping bag and pipe onto half of the macaron shells. Sandwich with the remaining shells.
- Decorating the Mummies:
- Melt the white candy melts or white chocolate and transfer to a piping bag with a thin round tip.
- Pipe horizontal lines across the macarons, leaving a little space in the center.
- Place two candy eyes in the space you left untouched.
- Pipe more lines above and below the eyes to give the appearance of wrapped mummy bandages.
- Allow the decorated macarons to set for at least an hour in the fridge. Before serving, let them come to room temperature for the best flavor and texture.
Notes
Note: Using cups as a measure for baking, especially macarons, is less precise than using grams. For the best results, especially with delicate recipes like macarons, using a kitchen scale and measuring in grams is recommended.
Recommended Products
As an Amazon Associate and member of other affiliate programs, I earn from qualifying purchases.
-
 Silicone Baking Mat Macaron Mat Kit(16pcs set) Macaroon Baking Mat Set of 2 Half Sheet Macaron Silicone Mat Nonstick Macaron Mat Sheet,6 Piping Tip,2 Piping Bag with 3 Bag Tie,2 coupler (11.6"x16.5")
 -
 1 Bottle Candy Eyeballs Eyes Cake Cupcake Toppers Cookie Decorations Edible Dessert Sprinkles for Halloween Christmas Cake Cupcakes Decoration
More Spooky Halloween Recipes to Try


